Monday, August 20, 2012

Just Add Water?


My new (well new to me) 2010 F250 King Ranch. The above Video is the Moonroof leaking. My wife is running the hose on the moonroof from the bed while I video inside. I keep returning it to the Sarasota Ford
dealer but they say it is not leaking. You should have seen it during one of our local Thunderstorms. It was really ugly, water was running down the right front post and onto the floor and apparantly into the fuse box.


Bought this truck so my wife, dog and cats can pull a fifth wheel around the country in a little bit of comfort. Apparantly now were going to have to wear rain suits when it's raining. That is if I don't find someone who can figure out how to stop my sunroof from leaking.

Monday, June 11, 2012


                                    Here is a video of the land after bushhogging. What a difference! I left the patch of grass at the end of the video for the birds. I saw an Indigo Bunting several times in this area along with many other small birds that seemed to be foraging for food in this area, along with some (I'll call them field mice) which I am sure are a tasty treat for the red foxes that live in the den in the low area.


The Campsite, If only my new 2010 Ford F250 HD Turbo Diesel would be as reliable as this old 498N Ford. It amazes me how it starts every time on the first try. The hotter it gets the better it runs. It is an awfully simple system, not near as complex as the vehicles made today.


Not too many level places on this piece of property.


Saturday, May 12, 2012

Just A Thought


I was sitting here looking at my last post with the pegs in the bucket and thinking that maybe I should have somehow tried to make the pegs myself. By the looks of the eight sided pegs I figured I would only have needed a table saw and some oak boards and I could have done these myself. The problem is I have no table saw and nowhere to put the thing and where would I get the oak boards from. I guess it was bothering me that these things weren't cheap and if I put two per joint like I planned then I would probably need about 100 more than I have already bought. This is in addition to the learning process I am going through trying to figure out the best way to use a gin pole for my small barn project. I am sure that one will help out especially if I only have a couple of people helping me but again the thing isn't cheap and the logistics are all new to me. I purchased a strap from Tractor Supply that is really too long but it looks sturdy and if I wrap it a one or two  times around the beam then the 20' stap is effectivly reduced to the length I need. The strap has the hooks with the spring loaded self locking lever which I liked and has a hook at both ends. This means I will need two straps and end up with four hooks coming together at the block. Four hooks coming to one hook is not going to work so I purchased what I'll call an adapter but the end that will accomidate the four hooks isn't large enough so above is a picture of my compromise. This is one strap so imagine two of these hanging on the block. I don't know about you but I'm thinking this looks a little rediculous although I do believe it will work. I guess my point is I'll tackel these issues one at a time so for now I'll just pay for someone else to do the pegs while I try to figure out the best way to put this thing together and not hurt anyone.

Thursday, May 10, 2012

Really Hot outside, Ordering the joist hangers, and buying the pegs and straps for raising.


Got New straps for raising!


New Pegs or wood nails. Probably gonna need more. I'm soaking these in a mixture of linseed oil and turpentinde. These are 8 sided and 12" long. I didn't count but should be approx. 80 per bucket. 


Pegs oiled and ready. Since these pegs appear to be dried when they arrived, I believed it was a good idea to oil them so they wouldn't draw moisture from the timber surrounding the pegs. Probably make them go in a little easier also. I Hope.

Thursday, May 3, 2012

The Learning Continues


Just purchased this Double Pulley Wood Block and Tackle for 3/4 inch rope to help with lifting during the assembly process. Got it for about $80 with shipping which is a whole lot less than a new set. Now I have to pick out  a nice straight pine that I can gert and peel to use for a gin pole. I have never used one so thanks to the internet I should be able to figure it out. Here is pretty good website that explains the setup and safety. I figure a bent will weight just under 1,000 lbs. so with a couple of strong backs and a pulley at the bottom of the gin pole to redirect the pull and hooked to a tractor, the bents should be pretty easy to upright once assembled.

http://www.globalsecurity.org/military/library/policy/navy/nrtc/14251_ch6.pdf

Another really good site that describes the construction of a similar shed as mine is:

http://www.forestryforum.com/board/index.php?topic=16300.0
and

http://www.forestryforum.com/board/index.php?topic=30792.0

Although my maximum beam  length by design is 12', I believe that it will still be beneficial for me to use a gin pole if I can figure out how to do it effeciently and safely. I still need to find me a single redirecting block for a 3/4" rope.


Tuesday, April 10, 2012

A Little Progress to Fuel Motivation for the rest of The Project.


The rafters are resting in the mortises cut into the top plate. The rafters will be approx 1.5 ft higher giving that much more headroom. It won't be spacious but there will be sufficient headroom with the peak about 9 ft off the floor. The kneewall will be 3 1/2 ft.


I'm gonna have to work on the joints a little in this top plate. Need to make them about a 1/16 of an inch wider.
Overall I'm pretty satisfied with how the rafters fit.  


Friday, April 6, 2012


I got some new members to my mighty little barn family. I've been on vacation now about 20 days and was expecting to have accomplished quite a bit on the barn project, but with going to Gainsville where our daughter goes to college, trip to Georgia for 6 days of camping and working on the land, all the stuff that has to be done around the house and also buying a car for Caitlin, I just havn't gotten alot done. My next concern is the fact that it's getting pretty hot during the day here. Last year at one point I decided to stop completly until it got cool enough to work outside during the day and I've got a feeling it won't be long till I won't be able to get much done until it cools off.

Sunday, April 1, 2012


Here's what I'm up to now. I still have two more post to complete and the top plate that I'm working on here is one of six. After that I have twenty eight rafters to cut. The rafters are pretty easy and straight forward. These rafter seats are one of my least favorite to do. I just cut one incorrectly, had something else on my mind and didn't measure enough. The joint will still work but the bearing area for the rafter tail was reduced quite a bit. I'll try to explain on another video.

Tuesday, February 28, 2012

Rafter Tails all sealed and oiled.


I'm going to have to redo these pictures. Not sure what happened to cause them to  be so light. Must have pushed the wrong button.


Monday, February 27, 2012

Started working on the rafters today.

Well it looks like it's square. Had to get the calculator out. Remember, A2+B2 =C2. If this wasn't a 12/12 pitch roof I would really be in trouble. Remember sine, cosine and tangent? I'm getting a headache!

Collar ties designed to prevent spreading. The rafter pictured  is 4x6's but I will make the one's over the bents or post out of 6x6's and they will be the only ones with the collar ties except for this one. This will help carry the load down and reduce the spreading forces of the rafters.I will put this one in the back.
I want a block and tackel to raise heavy items to  the loft. I am thinking this will extend about 2 ft. from the last rafterwhich will be about a total of 4 ft from the front wall and will have a support brace. The 8x8 will be notched out and extend for three rafters over the plywood sheathing to distribute the weight. The gap is for the 3/4 or  15/16 inch plywood sheathing. I intend to put the 2" polystyrene insulation on top of the plywood and metal roofing on top of that. This is a small roof and will be good experience if I decide to do the small house.
I inserted a 2x6 to simulate a collar tie.
This helped me to visualize how much room I would have in the loft. The loft over the porch will be acessable from inside via a laddar and is only 8ft. deep. I plan to be able to lift items to a loft access door . The porch will be under this. The loft in the rear will be 10 ft. deep. The middle bent will have a have rafters visible overhead. I'm thinking about a 4x4 copula to draft the heat out in the sumer. Not sure about this yet or how it will look.
This is my first real rafter tail.

Monday, February 13, 2012

What can I say, the pile is getting bigger.


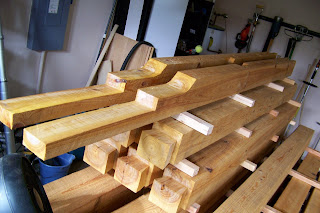
These are pictures of the completed timbers which have been cleaned and sealed on the ends and joints with a wax based sealer and the sides have were rolled with one coat of a the mixture of linseed oil and turpentine. When finished this pile will be approximately twice this size. OMG! What was I thinking? As you can see on my profile picture on the right I am working on my disguise. I think I'll call myself Zebadiah. Wasn't he Amish?


Sunday, January 22, 2012

Don't light a match.


It feels like the whole neighborhood smells like turpentine. I heard a jogger exclaim, "What's that smell, someone must be cleaning something." I guess it smells like pine sol. I do believe it looks pretty good. They still feel a little oily and they are starting to lighten up a bit. When I first applied a mixture of 50/50 linseed oil and turpentine, they appeared almost orange. And they soaked the stuff up like a sponge. I have read that the linseed oil is like food for mold and mildew but some guys have been doing this recipe their whole life with no problems. At least I feel better about them not drying out so bad and the look isn't too bad either.

Washy, Washy

The reason for the washy washy is that is what we tell our dog Chloe when it's time for a bath, she always tilts her head and gets really nervous. She hates the bath.
After reading and reading about the process of how to clean and care for the natural finish of the wood, I am still somewhat confused. I guess I look at this wood so much that I have really become infatuated or obsessed with the color and grain of this wood. I think it's beautiful. I type this as I sit in my living room in front of my fake fireplace (gas logs) and plastic floors (fake floors, aka laminate). I like the gas log technology but miss the look, sound and smell of an open fire. As for laminate flooring, the stuff looks great and will resist scratching under our dog playing with here bones and Frisbee and the two cats as they propel themselves forward or upward but I have learned to hate the stuff, It's just not natural. I digress, back to the wood. I have even counted the rings on the 8x8's and was a bit sad to find out if I have counted the rings correctly that these trees are over 100 years old. The next thing you know I will be trying to name them and include them in my will.  
This brings me to how to preserve the look because it appears they will darken over time and if left unprotected they will grey, which some people like. When they arrive at my home in the back of my pickup, the beams have a little dirt and some marks from the process of cutting and hauling whether they be from the saw or heister. The black marks as seen in the picture below are very difficult to remove. I have resorted to Kaboom, and pouring on some tide with bleach concentrate and scrub. Then I spray the whole beam with a mixture of bleach and water to brighten up the wood by removing any dirt and mildew. Then rinse thoroughly. The jury is still out as to whether there is any long term damage to the wood or fibers by doing this. After they dry I intend to put on a coat of boiled linseed oil and turpentine. Hopefully this will keep the mildew down and bring out the natural colors of the wood grain. It is also supposed to keep the beams from losing moisture from the sides too quickly and causing splitting and checking. 


Wednesday, January 18, 2012

I Can't do Sheetrock!


I actually thinks it's a disorder. When I do sheetrock I sand and sand  until I have a pile of dust and have to apply mud again. I then repeat the process while getting nowhere. I just can't get it perfectly smooth. My wife, my dad and I built the above house in Georgia and basically had to move because I knew every small flaw and some not so small until I almost drove myself crazy. I have to admit there were some other reasons but it sure didn't help. I could go on and on about some of the subs we hired also. There were some I wanted to hug while some, let just say prison is not an option. Being a contractor would be so easy if only you could find good honest help. Lets face it, you get out of jail and where do you go to get a job? The building industry! The reason I am writing about this is sort of therapy.  I basically completed the first cypress bent today and feel like I could still get it better but since I took another delivery today, I decided to consider this bent complete and get to work on the next one. It's only a barn and since I will be lucky if I live another 30 years so,  I am starting to wonder why I didn't just buy one of those cheaply made barns from  one of those big box stores like my neighbor suggested. It's the American way, right. My wife promptly explained to him that it was a work of art. I'm not so sure about that! Sure I'd like to think so but it would only be a work of art if someone that was skilled in timber framing had made it. Also someone that knew what he was doing would already be done.

Sunday, January 1, 2012

How do you eat and Elephant?

     Well assuming anyone would want to I have heard it is one bite at a time. This comes to mind as I drill and chisel away in my garage as my neighbors walk by and peer over at me to see what their deranged neighbor is doing. Occasionally one will stop and ask but for the most part they just look over. This is a very small percentage because I have many neighbors. About a hundred more than I am comfortable with. Anyway I have decided maybe to tell them I was building and ark like the guy in the movie. Although several answers do come to mind I just tell them the truth and they proceed on their way. I fantasize about hanging a gun on my belt, putting a chew of tobacco in my mouth, wearing a patch over my eye and doing some thing weird like talking to myself to stir up the rumors. Wait a minute, I'm already talking to myself!  I surely would like to know what their thinking. I've been doing this so long I am sure they give directions by saying "go a few houses past where the guy is always cutting wood." or something like that. It is usually strange to see anyone outside in the neighborhood except for the occasional walkers, dog walkers and a few bike riders sporting the latest attire probably designed by the latest Tour De France winner. Mostly all people down here do is eat out and shop. It is rare you see a neighbor cutting his own grass. I guess it would mean you didn't have anything better to do or don't have the money to pay someone else. This is mainly the reason every day is a parade of workers driving buy the house as they head to their next job to repair some broken item, clean a pool or scope out their next job. It is this reason I don't leave my tools out because items have been known to  just walk away at times. I know this because there is a nice socket set of mine who has a new owner or maybe sitting in a pawn shop somewhere waiting for one.  I digress, back to the bikers. Although I admire them for what they do I just get extremely bored riding the bike in the neighborhoods in Florida. I guess that's what they think about me as I sit in my garage and driveway  pounding away at my Cypress wood.
     I do feel as if I am getting better and faster at cutting joints but as I look at my pile of wood with hopeful expectations that it will all fit together nicely someday,  I get a daunting feeling building up inside as I look ahead at what I have left to do. Like the martial artist I slowly become one with my chisel, well maybe 50 or so but at least I'm better than I use to  be and somewhat closer to they day when I assemble my massive pile of wood into a small but very unique and sturdy barn/studio/greenhouse or whatever it turns out to be. If it doesn't work, I'm building a fire!